

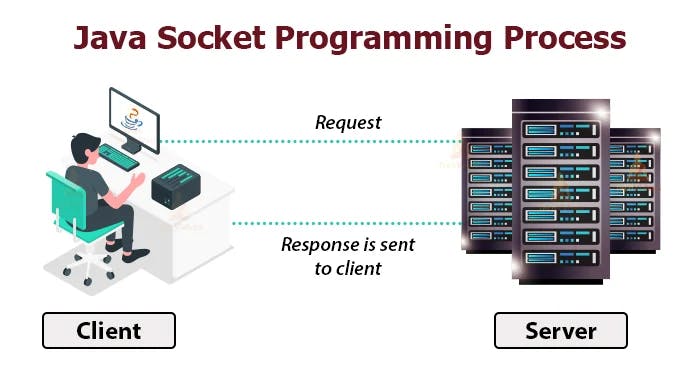
Client-server applications in many domains, including web, email, and file transfer, are built using socket programming, a vital component of network communication. When it comes to creating sockets and implementing network connections, Java offers a robust collection of classes and methods. This blog post will cover the fundamentals of socket programming in Java and a real-world example.
What is a Socket?
On a network, a socket serves as an endpoint for communication between two computers. It gives apps a way to transmit and receive data over the network. TCP and UDP are the two socket types that Java supports.
Transmission Control Protocol (TCP) offers connection-oriented communication between two applications and is a dependable stream-oriented protocol. It ensures that the recipient receives the data sent by the sender in the same sequence it was transmitted.
User Datagram Protocol (UDP) is a connectionless, unreliable protocol that offers a channel of communication between two programs. It does not ensure that the data will be delivered or arrive in the correct order.
Two categories of Sockets:
A server socket - It awaits a request from a client.
A client socket - It establishes communication between the client and server.
The client has to know two things about the server:
The server’s IP address.
The port Number.
Ports between 0 and 1023 are mainly used for administrative purposes (e.g., 21 for FTP, 23 for Telnet, 25 for email, and 80 for HTTP). In our program, we’ll be using port number 5000.
Creating a Socket Connection:
In Java, we create a socket connection by doing the following steps:
The server constructs a ServerSocket object to specify the port number on which our conversation will occur. Exception-handling methods are in use whenever an I/O error occurs.
The accept() method is called by the server to validate an incoming request to the socket.
A client then creates a Socket object by specifying the server name and the port number.
The Socket class constructor attempts to connect the client to the server using the provided port number.
If the connection is successful, the client and server can then communicate using I/O streams. The client and server socket classes are responsible for the I/O streams.
The client’s OutputStream communicates with the server’s InputStream, and the server’s OutputStream communicates with the client InputStream.
A stream is a collection of sequenced data.
The two major types of streams are:
A character stream (usually used with text files).
A byte stream (used with images).
A character stream is in human-readable language while a byte stream is in machine language.
In this situation, the client and server will simultaneously broadcast messages to each other’s streams because TCP is a two-way communication protocol.
Programming the server-side application:
A serversocket is an object of the ServerSocket that uses the constructor below:
serversocket = new ServerSocket(int port)
Port: The port number on which the server will listen to the client’s requests.
The ServerSocket object stays idle, waiting for network requests. Our client will attempt to connect to port
5000.Make sure the ports are the same, otherwise, the connection will fail.
We will use two while loops:
First Loop - This ensures that the server is indeed running.
Second Loop - It ensures that the server interacts with the client after connection until the client disconnects.
while (true){ //ensures server is running
    try {
        socket = serversocket.accept();

        inputStreamReader = new InputStreamReader(socket.getInputStream());
        outputStreamWriter = new OutputStreamWriter(socket.getOutputStream());

        bufferedReader = new BufferedReader(inputStreamReader);
        bufferedWriter = new BufferedWriter(outputStreamWriter);
        while (true) { // ensures server interacts with the client
            String msgFromClient = bufferedReader.readLine();

            System.out.println("Client: " + msgFromClient);
            bufferedWriter.write(" MSG Received");
            bufferedWriter.newLine();
            bufferedWriter.flush();

          if (msgFromClient.equalsIgnoreCase("BYE"))
              break;

         }
         socket.close();
         inputStreamReader.close();
         outputStreamWriter.close();
         bufferedReader.close();
         bufferedWriter.close();

     } catch (IOException e) {
        e.printStackTrace();
  }
}
We used the following methods for the server-side program above:
public InputStream getInputStream()- It returns anInputStreamobject that receives data.public OutputStream getOutputStream()- It returns anOutputStreamobject for sending data.public Socket accept()- It awaits client connection (the program won’t continue until the client is connected). When you connect, you’ll get a socket object that you can use to communicate with the client.BufferedReader()- It wraps inputStreamReader to improve efficiency.BufferedWriter()- It wraps outputStreamReader to improve efficiency.BufferedWriter.flush()- Flushes the output streams. It forces any buffered output bytes to be overwritten. The flush method is invoked when the buffer is full.void close()- This method closes the server socket i.e. stops waiting for requests from clients.
Here is the entire code for the server-side application:
package com. company;

import java.io.*;
import java.net.ServerSocket;
import java.net.Socket;

public class Server {

  public static void main(String[] args) throws IOException {
      Socket socket ;
      InputStreamReader inputStreamReader ;
      OutputStreamWriter outputStreamWriter ;
      BufferedReader bufferedReader ;
      BufferedWriter bufferedWriter ;
      ServerSocket serversocket ;

      serversocket = new ServerSocket(5000);

      while (true) {
          try {

              socket = serversocket.accept();

              inputStreamReader = new InputStreamReader(socket.getInputStream());
              outputStreamWriter = new OutputStreamWriter(socket.getOutputStream());
              bufferedReader = new BufferedReader(inputStreamReader);
              bufferedWriter = new BufferedWriter(outputStreamWriter);

              while (true){
                  String msgFromClient = bufferedReader.readLine();
                  System.out.println("Client: " + msgFromClient);
                  bufferedWriter.write(" MSG Received");
                  bufferedWriter.newLine();
                  bufferedWriter.flush();

                  if (msgFromClient.equalsIgnoreCase("BYE"))
                  break;
              }
              socket.close();
              inputStreamReader.close();
              outputStreamWriter.close();
              bufferedReader.close();
              bufferedWriter.close();

          } catch (IOException e) {
              e.printStackTrace();
          }
        }
    }
}
A sample output of this code is:
Connected
Client: Hey there
Client: I am doing this for the first time
Client: BYE
Closing connection
Programming the client-side application:
There are two ways to access a Socket instance:
The server receives it as a
returnvalue of theaccept()method.You can also use the following code to create a
Socket:
socket = new Socket("localhost", 5000);
In the code above, a localhost is a domain name that redirects you to your computer. It resolves to 127.0.0.1 as the IP address. A port number is in the second argument.
We generate I/O streams using the socket object, as shown below:
inputStreamReader = new InputStreamReader(socket.getInputStream());
outputStreamWriter = new OutputStreamWriter(socket.getOutputStream());
On the client side, we need to use a Scanner object to get user input:
Scanner scanner = new Scanner(System.in);
System.in specifies that we are getting the keyboard input.
Here is the full code for the client-side application:
package com. company;

import java.io.*;
import java.net.Socket;
import java.util.Scanner;

public class client {

    public static void main(String[] args) {
        Socket socket = null;
        InputStreamReader inputStreamReader = null;
        OutputStreamWriter outputStreamWriter = null;
        BufferedReader bufferedReader = null;
        BufferedWriter bufferedWriter = null;

        try {
            socket = new Socket("localhost", 5000);
            inputStreamReader = new InputStreamReader(socket.getInputStream());
            outputStreamWriter = new OutputStreamWriter(socket.getOutputStream());
            bufferedReader = new BufferedReader(inputStreamReader);
            bufferedWriter = new BufferedWriter(outputStreamWriter);

            Scanner scanner = new Scanner(System.in);
            while (true){
                String msgToSend = scanner.nextLine();
                bufferedWriter.write(msgToSend);
                bufferedWriter.newLine();
                bufferedWriter.flush();

                System.out.println("Server: " + bufferedReader.readLine());  //printing the server message

                if (msgToSend.equalsIgnoreCase("BYE"))
                    break;
            }
        } catch (IOException e) {
            e.printStackTrace();
        } finally {
             try {
                  if (socket != null)
                  socket.close();
                  if (inputStreamReader != null)
                    inputStreamReader.close();
                  if (outputStreamWriter != null)
                  outputStreamWriter.close();
                  if (bufferedReader != null)
                  bufferedReader.close();
                  if (bufferedWriter != null)
                  bufferedWriter.close();
             } catch (IOException e) {
            e.printStackTrace();
          }
       }
    }
}
A sample output of this code is shown below:
Hey there
Server:  Message Received
I am doing this for the first time
Server:  Message Received
BYE
Server:  Message Received
Testing the applications:
Using Eclipse or other IDEs
Compile the two programs.
Run the server program first, then the client application.
Type messages in the client window, which will be received and shown by the server window at the same time.
To exit, type BYE.
Using command prompt/terminal:
Make a new folder named
project(it’s your package name).Put the
Server.javaandClient.javainto theprojectfolder.Open the
command promptand navigate to therootpath.Execute
javac project\Server.javaand thenjava project.Server.Run the
clientprogram using the same process as theServerprogram.You can then type messages in the
clientwindow.
Example:
Hey there
Server:  Message Received
I am doing this for the first time
Server:  Message Received
BYE
Server:  Message Received
If the port is already in use, the application may result in an error. To solve this issue, change the port number to a unique value.
Conclusion
In this tutorial, we learned about sockets and the TCP/IP protocol. We specifically covered the fundamentals of socket programming in Java.
Furthermore, we discussed how data flow and client/server interactions work. You can, therefore, use this knowledge to build other highly productive applications.